Finding Your Area's Site and Files
Where is it in Cascade? | Where are the Folders and Files? | Some Important Editing/Selection Tips | The Trash Icon and Restoring Accidental Deletions | Can't find or don't recognize items in the asset tree? | Where are those "Hidden"/Staging pages?
Where is it in Cascade?
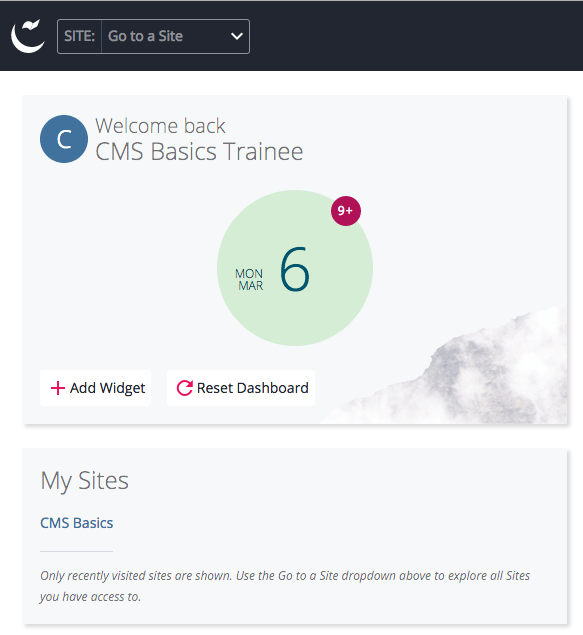
When logging in to the Cascade CMS for the first time, the default is for Users to see their own Home or Dashboard view, with the Asset Tree, Previews, and Editing/Action options not showing.
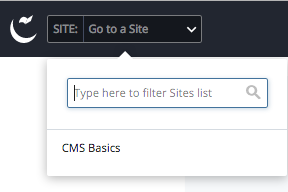
You can get into your Site[s] by selecting from the Sites Selector popout at the left side of the Cascade Menu Bar [SITE: Go to a Site]. If you have access to more than one Site, you should see links to each of those Sites listed there as well. You may also have a Default Site link for your User showing in your My Sites widget. Upon subsequent logins and other activity, you should also see links to your visited materials available from the My Content Widget's Recent items list. Additionally, up to 100 of your most-recently visited items can be accessed under the Cascade Menu Bar's My Content area).
 |
Log out at any time |
|
|

Once inside your site, you will see additional options in the Cascade Menu Bar:
- Add Content will allow you to create new Folders, Pages, and Blocks, and to upload Files. It is the equivalent of the v.7 New Menu.
- Site Content will refresh, or return you to, your Asset Tree / Information-Action Panels view.
The other persistent options of the Cascade Menu bar:
- My Content will take you to an area where you can see Recently visited assets, review Drafts stored under your User profile, and find more information about the materials you have permission to edit.
- Search allows you to search your Site(s) for asset names, text, etc. or to employ advanced search options.
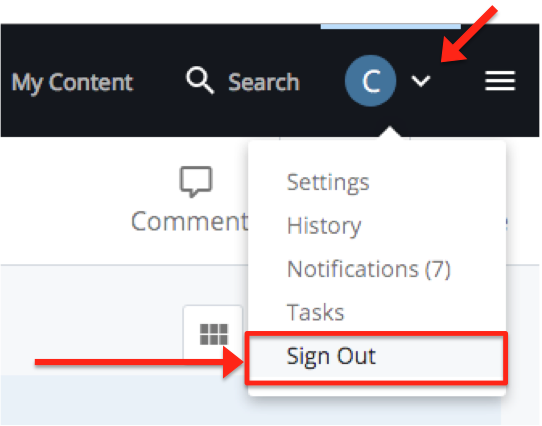
- User Options allow you to change your user Settings (preferences), see your History of visited assets, view your Notifications and messages within the CMS, review your Tasks, and to Sign Out of the CMS.
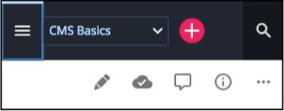
- The Stack Menu (aka "hamburger" menu) will give you access to your active Site's Publishing Queue, Reports, and more*; as well as links to the Hannon Hill Knowledge Base pages.
You may also notice that the Cascade interface is responsive to the width and display resolution of the browser window through which you have logged into Cascade.
So, for example, you may find that at narrower widths your "My Content" link moves from the black Cascade Menu Bar to being under the Stack Menu; or, you may see the descriptive labels for the action buttons [Edit, Publish, Comments, Details, More] disappear, leaving only the icons [e.g. pencil, cloud, cartoon speech bubble, circled letter "i", 3 horizontal dots]. * At the narrowest widths, you may also see "Site Content" and "Dashboard" or other items move under the Stack Menu as well, and the Stack Menu itself may shift to the opposite corner.
![]()
Also, remember that the CMS is largely a permissions-based application. For example, a User without Publishing privileges may not see any Publish-related options in their interface views at all.
If you want more information about an icon or an asset, roll over it with your cursor and hold for a second (without clicking), and you should see information displayed such as the name of an icon or the full system path of page, folder, or file. Clicking on an asset name in a listing will take you to the asset itself.
Where are the Folders and Files themselves?
Once you have selected your Site (e.g. from the Site Selector), the CMS will take you to your Site Content.
The Asset Tree
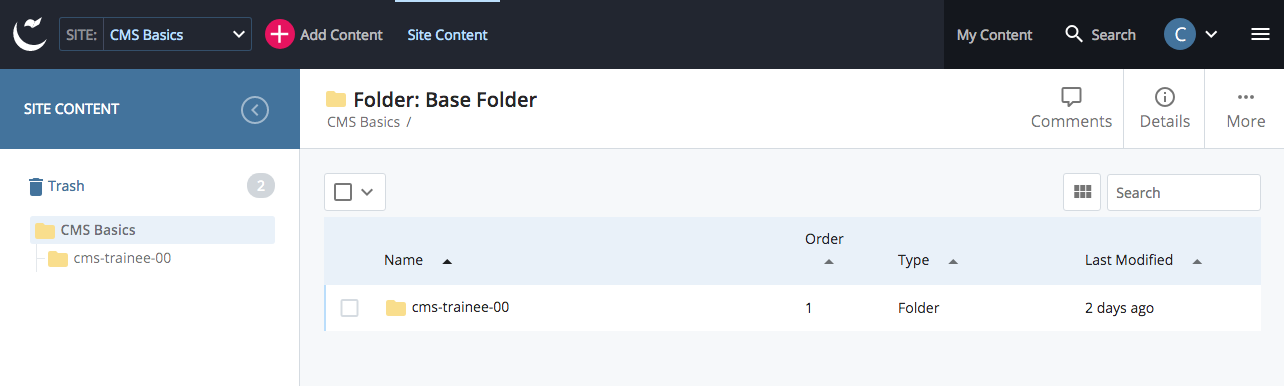
The Asset Tree appears as a left-hand side panel in the Site Content view. First time users might see the Asset Tree collapsed, initially, showing only one or two Folders: The site's "root", or base folder; and the site's home directory folder.
|
See also: Important Editing Tips
|
To expand the Asset Tree, click on any Folder to open it. Clicking again on the same folder will toggle it closed. To select a Folder for Editing (and/or to see its Contents List Preview along with its identifying information and Editing/Details/Actions options), you may initially need to click on the angle-bracket/arrow which appears to the right of the Folder as your cursor rolls over the item's listing in the Asset Tree. Clicking on the name of a Page, File, or other non-folder asset from the Asset Tree will load that item as the active asset directly into the right-hand side Preview panel, along with its appropriate Identifying Information and Editing/Details/Actions options. |
The Preview Panels
The right-hand side Preview panels offer identifying information about the active, selected Asset, as well as Editing, Commenting, Details information, and other User action options.
Note: To allow more room for the Preview panels side, the left-hand side Asset Tree Panel can be collapsed (and alternately expanded) by clicking on the circled angle-bracket arrow in the left panel's header bar.
Folder selected – showing its Folder Contents Listing; identifying information at the top, and action option buttons displayed: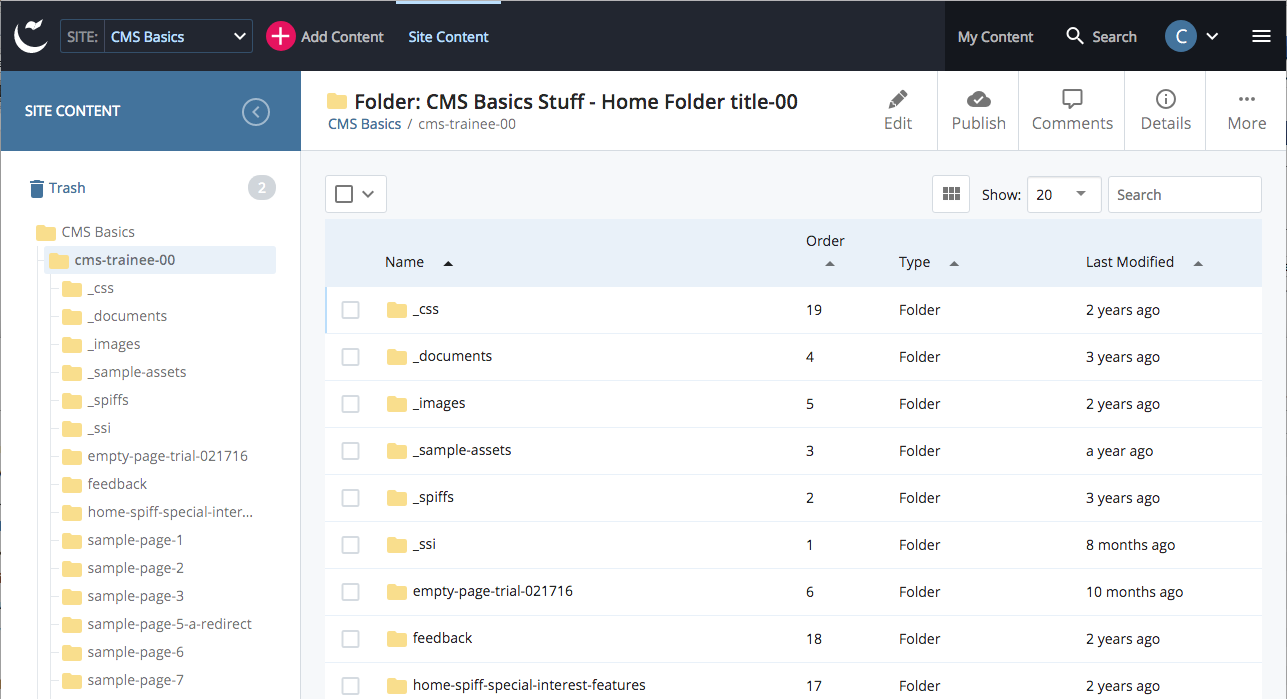
Page selected – identifying information at the top, page Preview and action options buttons displayed:
(Regions rollovers can show with More > Show Regions)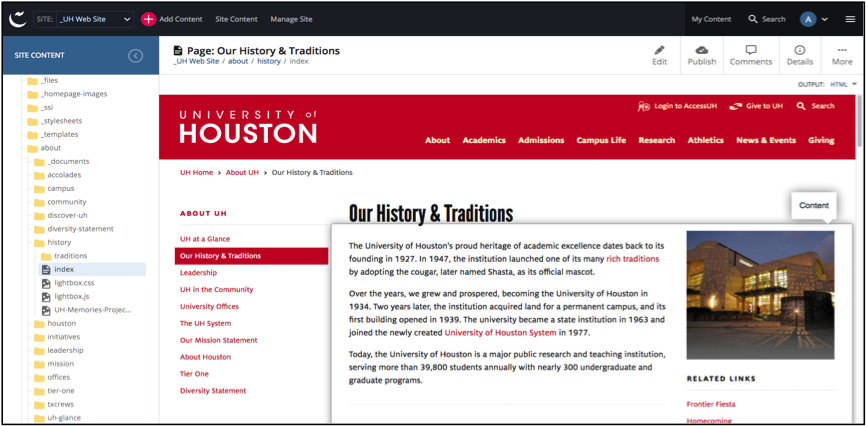
Some Important Editing and Asset Selection Tips:
Please Note:
A number of editing tools within Cascade CMS must be selected in a specific way for them to work correctly. [TLDR]
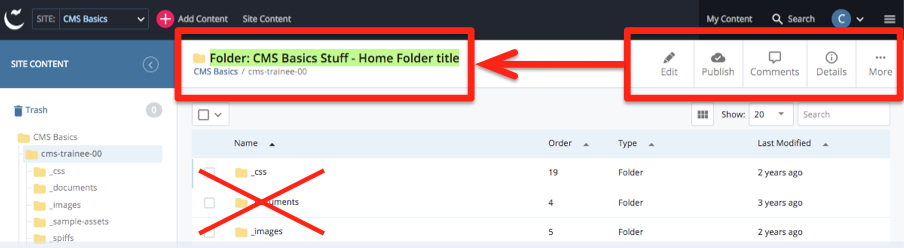
For example, you should note that whichever Asset is identified at the top of the right-hand side Preview panel by asset-type: Title and by system-path is the selected, active Asset. (The asset-type: Title row is highlighted in green in the illustration below.)
This is the item the CMS thinks you will be addressing when you use the Edit Bar buttons at the top-right:
Edit, Publish, Comments, Details, More.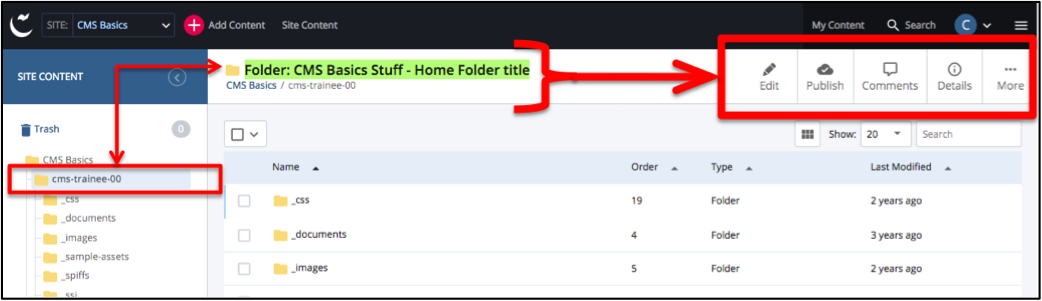
Those ever-present main editing/options buttons, which appear at the top right [Edit, Publish, Comments, Details, ... More] will always relate to the active, selected asset identified to their left (illustrated again, below).
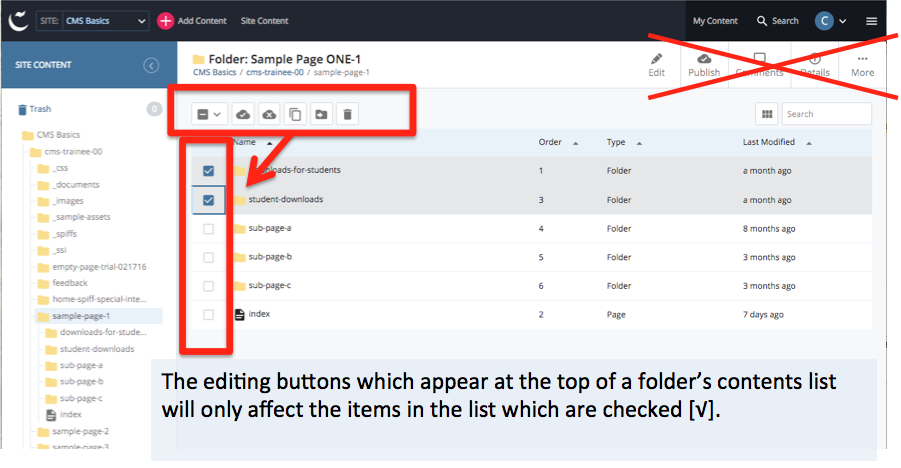
The checkboxes next to the child-items in a Folder's Contents List should not be checked when you intend to use any of the main, top-right options/actions, because the top-right options/actions can only apply to the active, selected asset: i.e. the parent folder itself. Checking these boxes will result in the main action options becoming de-activated.
However, as illustrated below, whenever one or more items in a Folder's Contents List is Checked, (and provided your User profile includes Publishing privileges) you should then see a set of additional buttons appear at the top of the Contents List:
Select/Deselect All, Publish, Unpublish, Copy, Move, Delete:
Some important points to remember about these List-specific "multi-select" editing buttons for a Folder Contents List:

- These buttons will only appear if one or more items in the Contents List has its Checkbox selected.
- These buttons will only affect the items in the List which are Checked.
- Depending on your CMS-permissions, you may not see any or all of these buttons - e.g. they may only show if a user has Publishing permissions.
- These Publish and Unpublish actions will override default settings for Destinations which may be set to be "un-checked by default".
TIP: avoid the multi-select publishing for items which should not be published Live if you are unsure of the site's settings for the live/production Destination. Contact your Cascade site's manager or cms@uh.edu for more information about your site's administrative settings. - If you need to scroll down a long Folder Contents List for any reason just be aware that these List-specific buttons may become hidden under the title/ID bar above the Contents List. To use them, just scroll back to where they show again after Checking the desired items.
- You should stay aware of pagination. Folder Contents Lists typically allow you to select how many items will display on one "page" of results, especially where there are more than 20 items. Typically the number of items Listed per "page" can be adjusted with a selector at the top of the List: 10, 20, 30, or All.
Select "All" if you want to see (and/or select-check) the whole Folder Contents List.
- Be sure to look at the bottom of any List panel for pagination. The List-specific options will only apply to those items listed on the page of results currently being displayed, regardless of whether you have elected to "Select all..."

- If for any reason a checkbox is selected and the List-specific buttons are not showing in the interface, you may need to click on the item's linked name text, to go to that item and edit it directly (instead of as a selection from the List).
About the List-specific (multi-select) options [TLDR]
These list-specific checkbox options represent actions which could potentially be applied to multiple assets at the same time.
For example, they might all be Published or Unpublished at the same time, Copied at the same time, Moved all together to a new parent folder, or even Deleted all at the same time (assets moved to the Trash).
While this can represent convenience, please always keep in mind that it can also represent 2 of the 3 actions (Move; Delete; Rename [i.e. changing a system name]) which always trigger an automatic Un-publish (erasure from the server for the affected material): it's Cascade's way of helping you keep your site cleaned up on the server! So, manage that help thoughtfully, especially when using the multi-select options. You will not be able to choose whether or not to leave the Live site alone. And also remember: the automatic Un-publish never includes any kind of automatic Re-publish/replacement.
Also keep in mind that the list-specific options cannot and do not offer the array of individual editing options available by selecting each asset individually.
For example, Publishing a number of items together at one time in this way would not allow selection of different Destinations (e.g. Live for one, Staging for another). All Destinations which are available to the User initiating the action would be used for the action chosen for every item Checked in the Folder Contents List, and would be used regardless of whether or not each of those Destinations was set as a Default Destination or not. (Default Destinations are those which show as already-checked/selected when the Publishing/Unpublishing dialogs open.)
So, just remember that these list-specific multi-select actions may not have the same granularity of settings as the main editing options available on an asset-by-asset basis. Proceed carefully before applying the same action to multiple or complex assets.
Also remember, you can always go to and work individually with any one of a Folder's child-items simply by clicking on that item's name/title from the List (not the checkbox!) and the CMS will take you there and load that item as the active, selected asset, ready for you to edit.
TIP: Strong Recommendation !
If you do not want your Live site to be affected, DO NOT USE the multi-select checkboxes. You will not be able to choose which Publishing Destinations to use, or not use.
The Trash Icon and Restoring Accidental Deletions
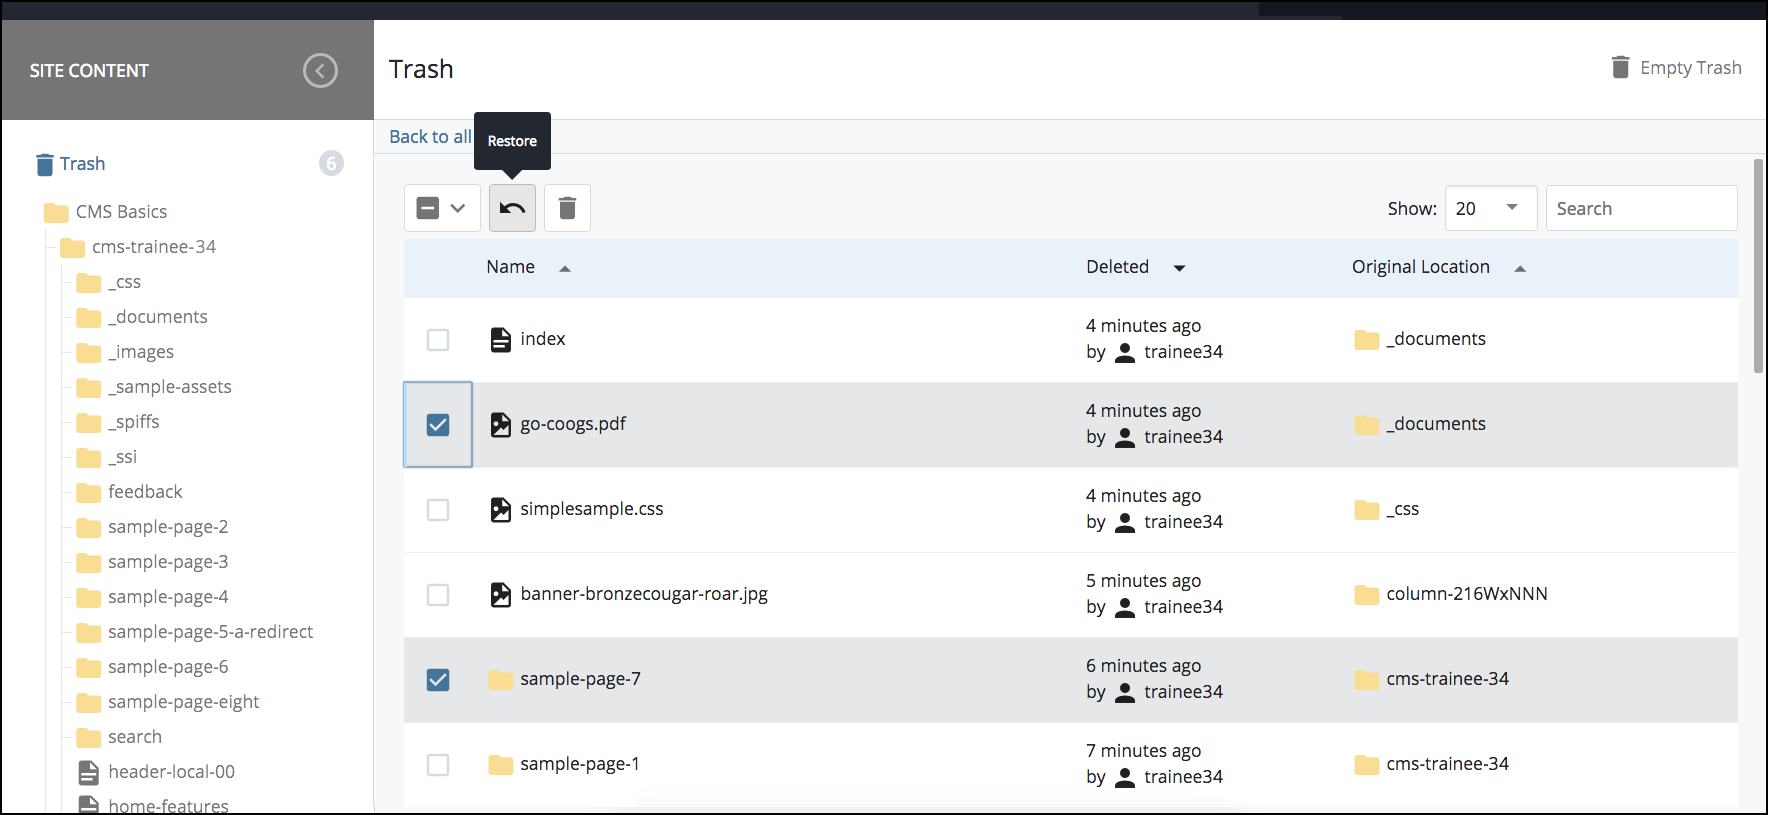
![]() If you have accidentally deleted an asset, or if you simply wish to retrieve a deleted asset, look first for the Trash icon at the top of the Site Content/Asset Tree panel. A number next to the Trash icon will indicate how many assets are being held there (formerly: the Recycle Bin).
If you have accidentally deleted an asset, or if you simply wish to retrieve a deleted asset, look first for the Trash icon at the top of the Site Content/Asset Tree panel. A number next to the Trash icon will indicate how many assets are being held there (formerly: the Recycle Bin).
Deleted materials are typically retained here for 2 weeks (15 Days).
 To retrieve an item, Click on the Trash icon and select the item (check its box) from the Trash container's Contents List, then select Restore (icon with left-pointing arrow). The checked item[s] will be reinstated to the Asset Tree in the original position. Be aware also, any intact internal links elsewhere in your site which had been pointed to this item would also become reactivated.
Caution: if you have created an asset of the same name and asset tree position while the original item was inside the Trash area, the restored item may either replace the newer item or be renamed with a number after the system name (e.g. "index" >> "index1"). You may need to update any system names or links which may have been reset because of the Delete/Restore activity, and republish affected materials.
To ensure each item ends up with the system name you intend, you may need to Rename one or the other of these items manually [More >> Rename]. Remember that for Renamed assets Cascade auto-unpublishes from their previous name. You will then decide what may need to be republished using the new name[s].
Other notes about selecting assets in Cascade
Correct selection (or lack of it) can affect other processes as well. For example: when uploading a file, the CMS should be able to honor a pre-selected folder as the intended destination, but only if the correct folder is properly selected first. The intended destination folder must first show as the identified asset at the top of the Information Panel. (Otherwise, simply use the Destination Folder chooser.)
Similarly, when using a Chooser's browse feature, an item's radio-button or checkbox must be definitely selected, not simply showing up at the top of the options, for it to be recognized as Chosen. For example, to the CMS an item next to a blank radio button is just an available option, not a Chosen item.
Please also note that because Cascade is a permissions-based interface, users without any Publishing permissions may not see the multi-select checkbox options for the Folder Contents List at all.
In addition to user permissions, individual browser capacities may also affect how selection processes work. If you are having difficulties working with any process within Cascade, you may find the difficulties alleviated by simply switching browsers.
Editing Shortcuts - Right Click for Context Menu - Keyboard Shortcuts
 In Cascade version 7 and previous, editing shortcuts were available by clicking a small triangular arrow which popped out when rolling your cursor over the asset name.
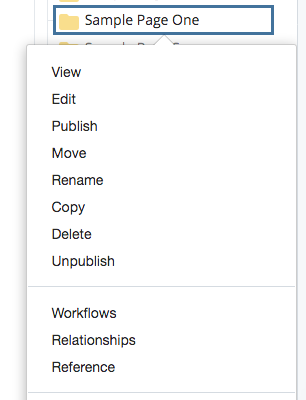
In Cascade version 8, this has been replaced by right-clicking on the asset's name itself, any where it appears - such as the Asset Tree or one of the user's report lists. Some systems may require different key commands to activate context menus (e.g. Control+click).
Editing options available this way are typically the ones Users will find under the More menu: View, Edit, Publish, Move, Rename, Copy, Delete, Unpublish, Workflows, Relationships, Reference, Versions. Available options may vary by user Permissions levels. [Note: UH does not currently use or support the use of the "Reference" type asset]
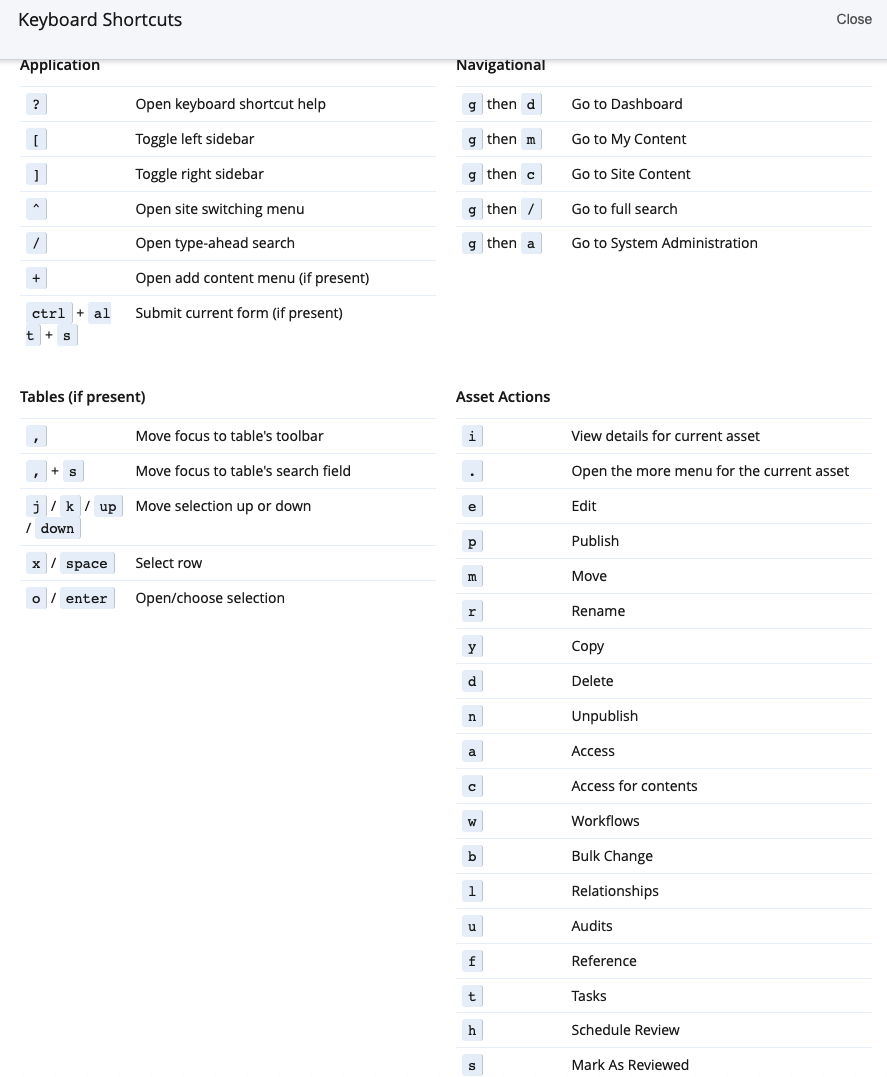
To review available key commands for the Cascade interface in general, press the "/" key plus Shift (i.e. the question mark key "?") when you are logged in (but not Editing!).
Can't find, or don't recognize the items in your asset tree?
It may be because Cascade CMS Users now have the option of easily distinguishing between assets showing identical system names in certain User report lists, available beginning with version 8. (These User's Reports - e.g. recently visited assets - were not available in version 7). Remember: in the UH CMS, the system-name for all webpage-assets intended to display to the public via browser is the same: "index".
Beginning with Cascade CMS version 8, the User has the ability to choose (and change) which type of information is used to visually identify whatever assets may show up in their various User Reports and lists. This choice also affects how the Asset Tree itself looks, and can change the apparent order of items included there.
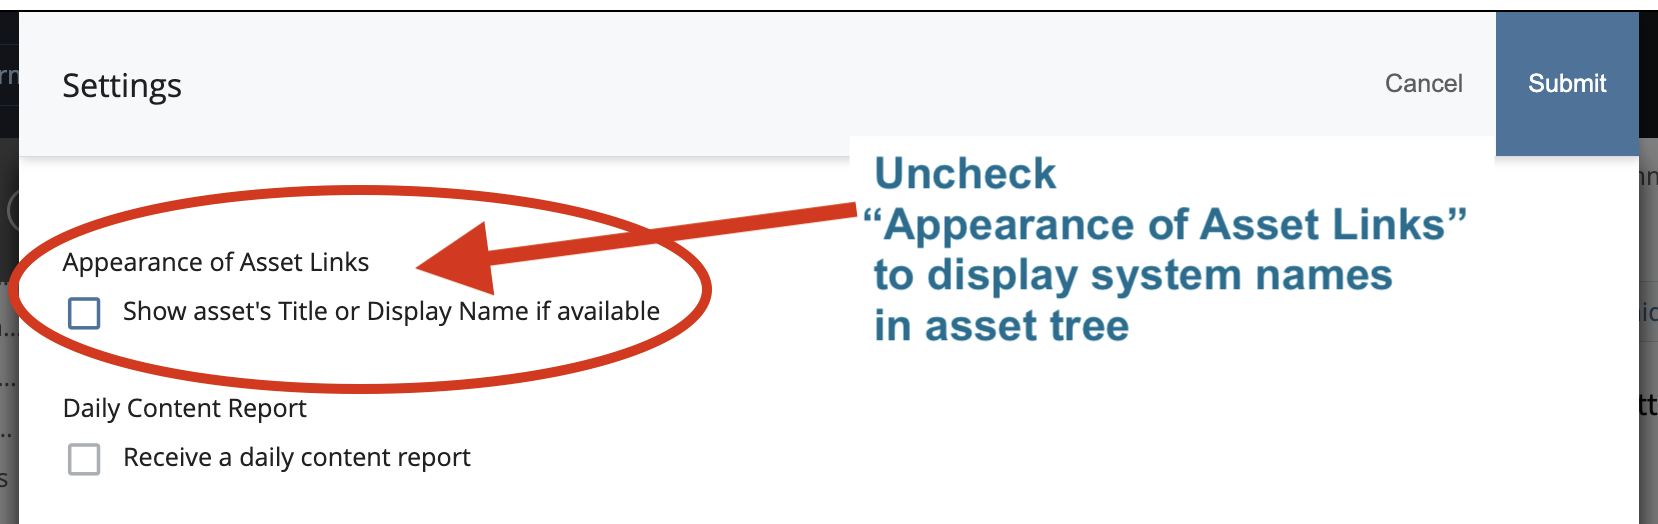
The default User setting now is to view all assets by their Metadata: Title or Display Name will be shown. (In version 7 and all prior versions only system names were used.)
The Asset Title view can be very helpful in reviewing the new user-focused reports. The system-name view can be very helpful in parsing out a web address, so that a site editor can more easily find the parallel asset-system-path inside the CMS.
You can toggle the view back and forth at will. If you want to switch back to viewing assets by their system-names, go to your User area, select "Settings" and make sure the "Appearance of Asset Links: Show asset's Title or Display Name if available" option is de-selected (not checked). That will allow the CMS to display system names in the Asset Tree.
Whichever view you are using, at any given time you can learn more about any asset by rolling your cursor over it and hovering (waiting a moment without clicking) for the information text to pop out. The information text can be used to help identify the asset, as it shows the asset's full system-name path within the CMS.
In the example below, under a user's My Content: Recent assets listing, rolling over the asset's name reveals the path. By contrast, clicking on the asset would take you to the asset itself.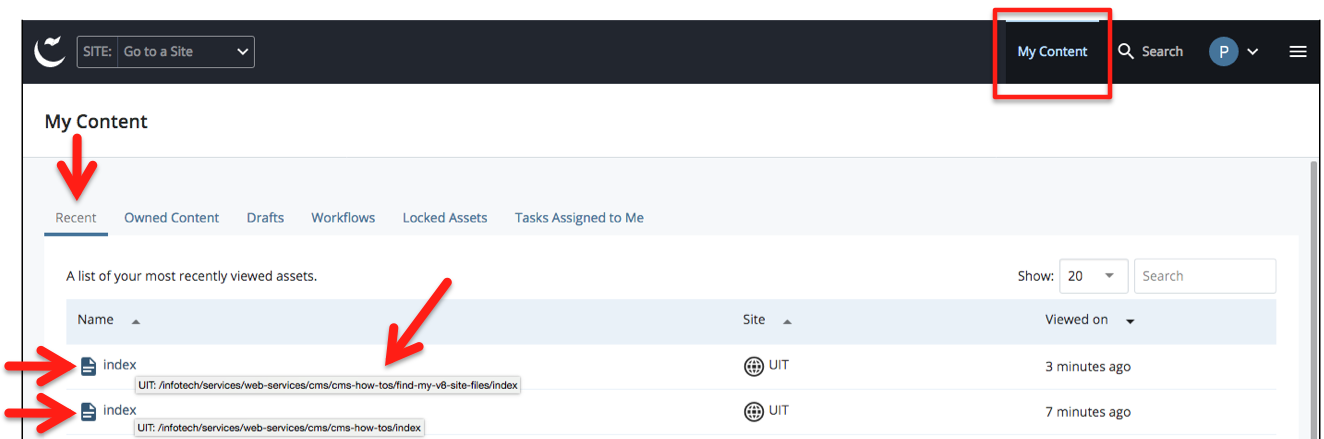
Feel free to adjust your User Settings and use the view which works for you! For further information, download the Reading the Asset Tree pdf.
Where Are Those "Hidden"/Staging Pages?
(aka the non-crawled pages)
When CMS Users are activated with Publishing privileges, they will be informed of what the staging- and/or test- publishing web addresses are for their site. Please contact either your site's acting CMS Site Manger, or Web Services if you are having difficulty seeing or finding your site's staging area. Some Users, particularly those from areas which employ independent servers, may need to contact that area's server administrator[s] for their information.
Viewing the Staging area[s] requires the use of a UH network connection. If working off-site (using a non-UH network) or using a non-secure UH connection, you will need to install UH VPN in order to view the Staging location[s]. Please visit the UIT site's VPN - Virtual Private Network pages for more information, including installation procedures for various operating systems.
Remember, the Staging area is a location on the server which search engines have been told to ignore, so this is a place where you can Publish out your pages for review, correction, or revision before search engines and/or the general public have had a chance to find them.
Also remember - publicizing the URLs for these pages can defeat the purpose of having a 'non-searched' area - so do not publish out live pages which contain links back to staging addresses!