Working with Files in the CMS
Discussion of File Assets | Uploading Files |
Discussion of File Assets in the CMS
In the Cascade CMS, a file-asset can consist of any one of a variety of different types of material, such as: PDFs (.pdf); MS Office type documents (e.g. .doc, .xls, .ppt, .wpd); text or rich-text documents (e.g. .html, .txt, .css, .js, .rtf, .svg, etc.); graphics (e.g. .jpg, .png, .gif); and more. The CMS will treat the file as a container holding file content. CMS users should remember that file-type-assets need to retain their respective file extension at the end of their CMS-system-name (aka Asset Name, or File Name).
Some basic editing tools are provided for text-type assets and graphics-type assets. For text, the CMS offers simple rich-text editors (WYSIWYG Editors), simple text editors (HTML Editor) and advanced text editors which provide some additional coding support. Graphics-type assets can be resized, cropped, flipped, and rotated.
Uploading Files
New Files can be added to your Site via the Add Content area.
At full browser window width, the Add Content Button should appear close to the Site Selector on the left hand side of the Cascade Menu Bar. You must be within a Site and have permission to create new content for this button to show. If it does not appear as a button in the bar, check first under the Stack Menu, where the option appears when the Cascade window is compressed in width.

STEPS
- Clicking the Add Content Button should display the Add Content Menu[s]. Click on any Containers offered to see the items inside. Files can be uploaded into the CMS database by using a File Asset Factory, typically found inside a container named Default listed under the Add Content menu.
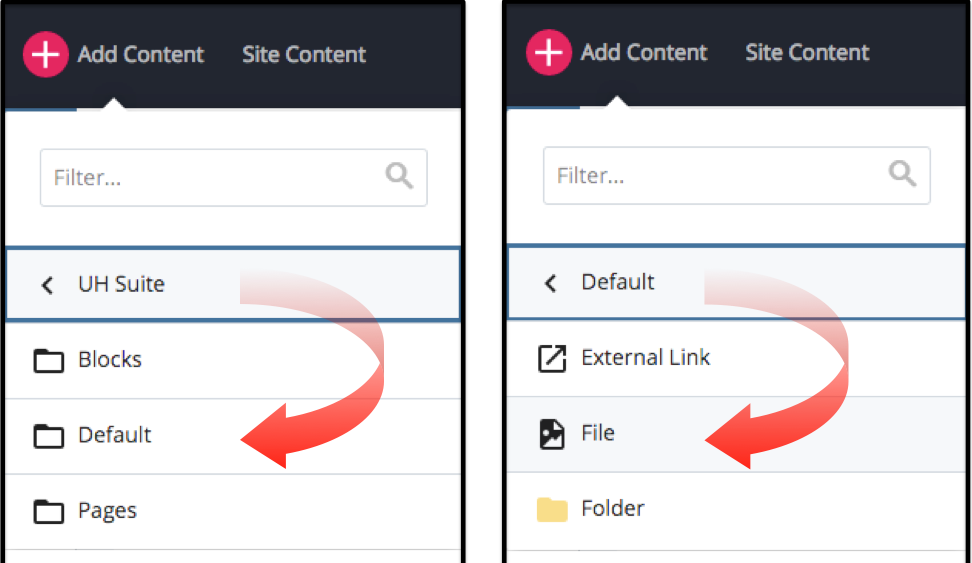
A caution: If you see multiple top-level containers under your Add Content button, each with similar contents inside (as opposed to simply seeing categories of asset types, as above), it may indicate that there are different sets of asset factories for different areas within the CMS Site. And if so, and even if you have permission to use each of the various collections, it is important to choose the correct area for your purpose because this process tells the CMS how to build the new item – i.e. by using the resources which are specific to the appropriate site or area. Choosing the wrong area could mean the resulting items may not work correctly, and/or parts of your site could 'break' when published.
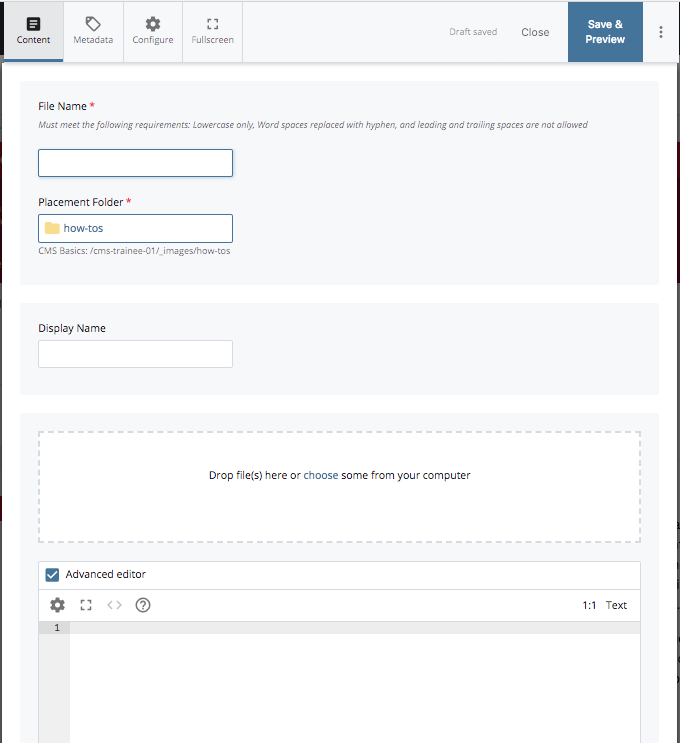
- With the File Asset Factory chosen, a Dialog would then appear, illustrated below.
- The File's System Name. You do not need to start filling in a filename, as the CMS will first pull (and filter) the native information from the file itself once a file is chosen.
The CMS will check the filename and suggest a UH Server-friendly name. To accept that name, click the prompt text ('use the suggested name') twice: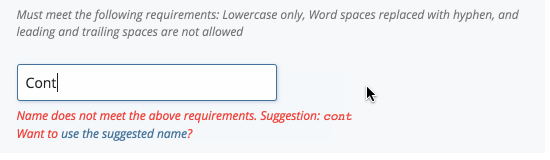
You do have the option to change the name. If you elect to use a different name, you must still follow system naming conventions: all lower-case, no spaces, separate words with dashes.
- To begin the upload process, either:
- Drag an item's icon over the dashed rectangle;
- or Click the text within the dashed rectangle to open a browsing dialog to locate the File you wish to upload.
- The new File's information should then show, both inside the dashed rectangle, as well as in the Name Field. Adjust the Name as needed and/or desired. See notes in steps above.
- Check the Placement Folder Chooser to make sure the new File will be uploaded into the directory you intend. As a shortcut, the CMS will default to whatever parent folder is nearest to whatever the selected asset was before the Add Content Menu was opened.
Click the Chooser to open a browsing dialog and select something different if you wish to change that directory.
- Enter a Display Name if desired. For example, you may wish to do this if the new file is intended to be offered from a Related Links set. The CMS would use the Display Name text to carry the link for this item.
- If you are creating a Text-type File you have the option of creating it on the fly using this same dialog. You do not need to upload anything, but you do need to ensure that the file's name retains the correct file extension (e.g. .css, .js, .php, .htm, .txt, and so forth). Simply write or paste the text content into the dialog's text editor, set a proper filename, then Save & Preview as usual.
- Save & Preview. The CMS will first save a Draft version of the new File to give the user a chance to preview and review before final upload. Draft assets can be viewed under the User's My Content area later, but will not show up in the Asset Tree, and will not be seen by other Users editing the Site.
- Submit. This finalizes the upload/creation. The dialog will give you the opportunity to make a note about the file. After the submission is accepted by the CMS, you should then be able to see the new File appear in the Asset Tree. NOTE: You may need to refresh your browser window or the Asset Tree to see the new File in place.