These mosiac pages provide detailed explanations of all
available Eudora functions.
An outgoing message is a message you send to someone
else.
To create an outgoing message, select New Message
from the Message menu. A new composition window
entitled No Recipient, No Subject is
displayed with the blinking insertion point situated
at the start of the To: field. The composition
window consists of the title bar, the icon bar, the
message header, and the message body.
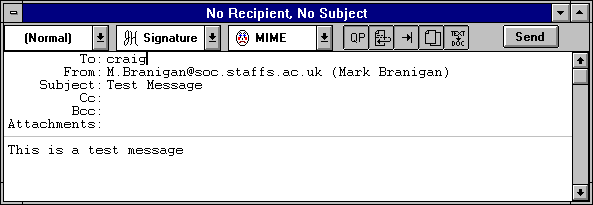
The title bar provides information about incoming
and outgoing messages, including the name of the
sender (if it is an incoming message) or addressee
(if it is an outgoing message), the time and date
the message was delivered or sent, and the message
subject. New messages are labeled No Recipient,
No Subject until they are sent or queued.
Messages get time stamps when they are sent, or if
they are queued for timed delivery.
The icon bar consists of a series of objects that
are displayed just under the composition window
title. It allows you to control your message’s
priority, override some of your preference settings
for that message only, and send or queue the
message. There three dropdown menus and five icons.
Each of the five icons may be turned on or off for
the current message by clicking on it. A raised icon denotes that the
icon has been turned on. The dropdown menus and icons
are described below.

Note: The default settings for the icon bar are determined
in the Switches... dialog (see the "Switches... Dialog"
section).
The leftmost object in the icon bar is the
Priority dropdown menu.
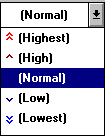
If you want to indicate that your message is of a
higher or lower priority than a normal message
(blank), use this menu to make the desired selection.
Priorities are discussed in the "Message Priorities"
section.
If this icon is checked, your signature
file is automatically attached to the end
of each message you send. Signatures are
discussed in the "Creating a Signature"
section.
The Attachment Type portion of this menu allows you
to select what format documents that you attach to
outgoing messages are encoded in: MIME or Bin Hex.
MIME is Multipurpose Internet Mail Extensions and Bin
Hex is the most compatible with old mailers and
previous versions of Eudora.
If this icon is checked, quoted-printable
encoding may be used when sending messages
that contain long lines of text or special
characters. When selected, it is used for
all plain text attachments. It is
recommended that this icon always be
checked.
If this icon is checked, a carriage return
is not required at the end of each line you
type in an outgoing message; Eudora
automatically wraps text to the next line,
with line breaks at roughly 76 characters
per line.
If this icon is checked, hitting the [tab]
key within the message body results in
Eudora inserting enough spaces to move the
insertion point to a multiple of 8
characters from the start of the line.
This mimics the way tabs work on many
terminals. If this icon is not checked,
hitting the [tab] key returns the cursor to
the To: field of the message header.
Note: This icon also controls the handling of
tabs in text that is pasted into the message window
and in plain text attachments that are sent as
documents (not binhexed). If Tabs in Body is
checked, tab spacing is replaced by blank spaces;
otherwise, the tabs are included in the text.
If this icon is checked, a copy of each
sent message is kept in the Out mailbox
(their summaries are marked with an "S" in
the far left column of the Out mailbox
window, indicating that they have been
sent). These messages are saved until they
are deleted or transferred to a different
folder.
If the Immediate Send option in the
Switches... dialog is turned on, the
rightmost button in the icon bar is labeled
Send. Clicking the Send button immediately
sends the message. Otherwise, this button
is labeled Queue, and has
The sender’s E-mail address. This is usually your
POP account plus your real name. You can use a
return address other than your POP account by
entering the desired address in the Return Address
field of the Configuration... dialog (see the
"Configuration... Dialog" section).
Brief text indicating the contents of the message.
This field can be left blank (though it is a breach
of E-mail etiquette to do so).
E-mail address or nickname of person to whom a copy
of the message is to be sent. Multiple addresses
are allowed but must be separated by commas. This
field may be left blank.
"Blind" carbon copy. Like addresses listed in the
Cc: field, addresses listed here receive copies of
the message. Unlike addresses listed in the Cc:
field, addresses listed here do not appear in the
message header of the recipients. This is useful
when you want to send a copy of a message to someone
without everyone else knowing you did so. Multiple
addresses are allowed but must be separated by
commas. This field can be left blank.
List of documents being sent along with the message.
Specify these through the Attach Document command
under the Message menu (see the "Attachments"
section). To delete an attachment from a message,
select it and press [delete]. You cannot enter
information directly into this field. This field
can be left blank.
After filling in the fields, move the insertion
point to the space below the message header. Type
the body of the message here. Feel free to use the
standard Machine text-editing tools provided under
the Edit menu (see the "Summary of Menu Commands"
section).
If the Word Wrap icon on the icon bar is checked (or
the Word Wrap option in the Switches... dialog is
turned on), you don’t need to press [return] at the
end of each line of text. The text wraps to the
next line automatically. If this option is not set,
be sure to type a [return] at the end of each line
or your message may not be legible on the
recipient’s computer. To use tabs in the message
body, check the Tabs in Body icon in the icon bar.
CLICK TO RETURN
 Quoted-Printable Encoding
 Word Wrap
 Tabs in Body
 Keep Copy
  Send or Queue